Background
Fasteners have come a long way since the early bone or horn pins and bone splinters. Many devices were designed later that were more efficient; such fasteners included buckles, laces, safety pins, and buttons. Buttons with buttonholes, while still an important practical method of closure even today, had their difficulties. Zippers were first conceived to replace the irritating nineteenth century practice of having to button up to forty tiny buttons on each shoe of the time.
In 1851, Elias Howe, the inventor of the sewing machine, developed what he called an automatic continuous clothing closure. It consisted of a series of clasps united by a connecting cord running or sliding upon ribs. Despite the potential of this ingenious breakthrough, the invention was never marketed.
Another inventor, Whitcomb L. Judson, came up with the idea of a slide fastener, which he patented in 1893. Judson’s mechanism was an arrangement of hooks and eyes with a slide clasp that would connect them. After Judson displayed the new clasp lockers at the 1893 World’s Columbian Exposition in Chicago, he obtained financial backing from Lewis Walker, and together they founded the Universal Fastener Company in 1894.
The first zippers were not much of an improvement over simpler buttons, and innovations came slowly over the next decade. Judson invented a zipper that would part completely (like the zippers found on today’s jackets), and he discovered it was better to clamp the teeth directly onto a cloth tape that could be sewn into a garment, rather than have the teeth themselves sewn into the garment.
Zippers were still subject to popping open and sticking as late as 1906, when Otto Frederick Gideon Sundback joined Judson’s company, then called the Automatic Hook and Eye Company. His patent for Plako in 1913 is considered to be the beginning of the modern zipper. His “Hookless Number One,” a device in which jaws clamped down on beads, was quickly replaced by “Hookless Number Two”, which was very similar to modem zippers. Nested, cup-shaped teeth formed the best zipper to date, and a machine that could stamp out the metal in one process made marketing the new fastener feasible.
The first zippers were introduced for use in World War I as fasteners for soldiers’ money belts, flying suits, and life-vests. Because of war shortages, Sundback developed a new machine that used only about 40 percent of the metal required by older machines.
Zippers for the general public were not produced until the 1920s, when B. F. Goodrich requested some for use in its company galoshes. It was Goodrich’s president, Bertram G. Work, who came up with the word zipper, but he wanted it to refer to the boots themselves, and not the device that fastened them, which he felt was more properly called a slide fastener.
The next change zippers underwent was also precipitated by a war—World War II. Zipper factories in Germany had been destroyed, and metal was scarce. A West German company, Opti-Werk GmbH, began research into new plastics, and this research resulted in numerous patents. J. R. Ruhrman and his associates were granted a German patent for developing a plastic ladder chain. Alden W. Hanson, in 1940, devised a method that allowed a plastic coil to be sewn into the zipper’s cloth. This was followed by a notched plastic wire, developed independently by A. Gerbach and the firm William PrymWencie, that could actually be woven into the cloth.
After a slow start, it was not long before zipper sales soared. In 1917, 24,000 zippers were sold; in 1934, the number had risen to 60 million. Today zippers are easily produced and sold in the billions, for everything from blue jeans to sleeping bags.
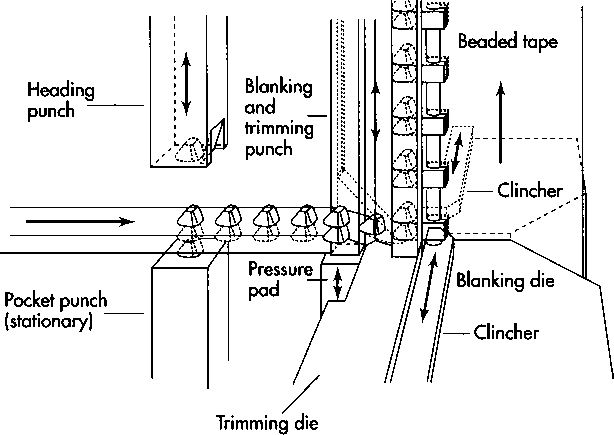
(A stringer consists of the tope (or cloth) and teeth that make up one side of the zipper. One method of making the stringer entails passing a flattened strip of wire between a heading punch and a pocket punch to form scoops. A blanking punch cuts around the scoops to form a Y shape. The legs of the Y are then clamped around the cloth tape)
Raw Materials
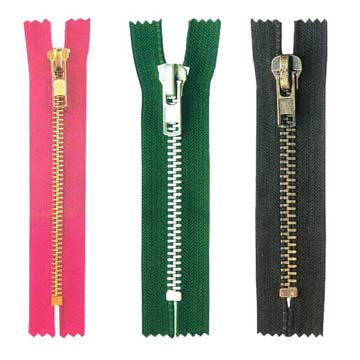
The basic elements of a zipper are: the stringer (the tape and teeth assembly that makes up one side of a zipper); the slider (opens and closes the zipper); a tab (pulled to move the slider); and stops (prevent the slider from leaving the chain). A separating zipper, instead of a bottom stop that connects the stringers, has two devices—a box and a pin—that function as stops when put together.
Metal zipper hardware can be made of stainless steel, aluminum, brass, zinc, or a nickel- silver alloy. Sometimes a steel zipper will be coated with brass or zinc, or it might be painted to match the color of the cloth tape or garment. Zippers with plastic hardware are made from polyester or nylon, while the slider and pull tab are usually made from steel or zinc. The cloth tapes are either made from cotton, polyester, or a blend of both. For zippers that open on both ends, the ends are not usually sewn into a garment, so that they are hidden as they are when a zipper is made to open at only one end. These zippers are strengthened using a strong cotton tape (that has been reinforced with nylon) applied to the ends to prevent fraying.
The Manufacturing Process
Today’s zippers comprise key components of either metal or plastic. Beyond this one very important difference, the steps involved in producing the finished product are essentially the same.
Making stringers—metal zippers
1 A stringer consists of the tape (or cloth) and teeth that make up one side of the zipper. The oldest process for making the stringers for a metal zipper is that process invented by Otto Sundback in 1923. A round wire is sent through a rolling mill, shaping it into a Y-shape. This wire is then sliced to form a tooth whose width is appropriate for the type of zipper desired. The tooth is then put into a slot on a rotating turntable to be punched into the shape of a scoop by a die. The turntable is rotated 90 degrees, and another tooth is fed into the slot. After another 90 degrees turn, the first tooth is clamped onto the cloth tape. The tape must be raised slightly over twice the thickness of the scoop—the cupped tooth—after clamping to allow room for the opposite tooth on the completed zipper. A slow and tedious process, its popularity has waned.
Another similar method originated in the 1940s. This entails a flattened strip of wire passing between a heading punch and a pocket punch to form scoops. A blanking punch cuts around the scoops to form a Y shape. The legs of the Y are then clamped around the cloth tape. This method proved to be faster and more effective than Sundback’s original.
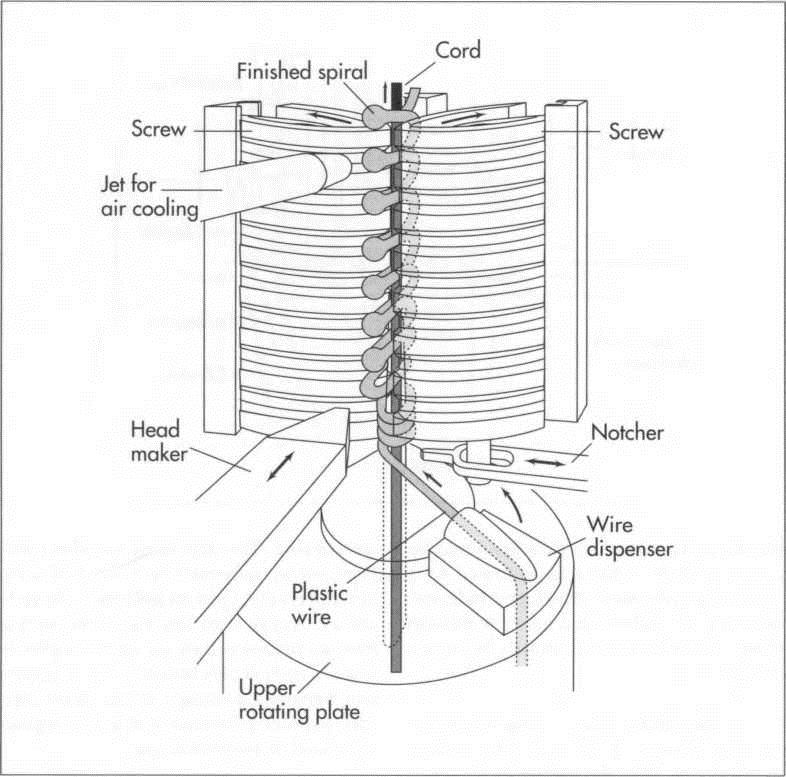
(To make the stringer for a spiral plastic zipper, a round plastic wire is notched and then fed between two heated screws. These screws, one rotating clockwise, the other counterclockwise, pull the plastic wire out to form loops. A head maker at the front of each loop then forms it into a round knob. This method requires that a left spiral and right spiral be made simultaneously on two separate machines so that the chains will match up on a finished zipper)
2 Yet another method, developed in the 1930s, uses molten metal to form teeth. A mold, shaped like a chain of teeth, is clamped around the cloth tape. Molten zinc under pressure is then injected into the mold. Water cools the mold, which then releases the shaped teeth. Any residue is trimmed.
Making stringers—plastic zippers
3 Plastic zippers can be spiral, toothed, ladder, or woven directly into the fabric. Two methods are used to make the stringers for a spiral plastic zipper. The first involves notching a round plastic wire before feeding it between two heated screws. These screws, one rotating clockwise, the other counter-clockwise, pull the plastic wire out to form loops. A head maker at the front of each loop then forms it into a round knob. Next, the plastic spiral is cooled with air. This method requires that a left spiral and right spiral be made simultaneously on two separate machines so that the chains will match up on a finished zipper. The second method for spiral plastic zippers makes both the left and right spiral simultaneously on one machine. A piece of wire is looped twice between notches on a rotating forming wheel. A pusher and head maker simultaneously press the plastic wires firmly into the notches and form the heads. This process makes two chains that are already linked together to be sewn onto two cloth tapes.
(The basic elements of a zipper are the stringer (the tape and teeth assembly that makes up one side of a zipper); the slider (opens and closes the zipper); a tab (pulled to move the slider); and stops (prevent the slider from leaving the chain).
4 To make the stringers for a toothed plastic zipper, a molding process is used that is similar to the metal process described in step #2 above. A rotating wheel has on its edge several small molds that are shaped like flattened teeth. Two cords run through the molds to connect the finished teeth together. Semi-molten plastic is fed into the mold, where it is held until it solidifies. A folding machine bends the teeth into a U-shape that can be sewn onto a cloth tape.
5 The stringers for a ladder plastic zipper are made by winding a plastic wire onto alternating spools that protrude from the edge of a rotating forming wheel. Strippers on each side lift the loops off the spools while a heading and notching wheel simultaneously presses the loops into a U shape and forms heads on the teeth, which are then sewn onto the cloth tape.
6 Superior garment zippers can be made by weaving the plastic wire directly into the cloth, using the same method as is used in cloth weaving. This method is not common in the United States, but such zippers are frequently imported.
Completing the manufacturing process
7 Once the individual stringers have been made, they are first joined together with a temporary device similar to a slider. They are then pressed, and, in the case of metal zippers, wire brushes scrub down sharp edges. The tapes are then starched, wrung out, and dried. Metal zippers are then waxed for smooth operation, and both types are rolled onto huge spools to be formed later into complete zippers.
8 The slider and pull tab are assembled separately after being stamped or die-cast from metal. The continuous zipper tape is then unrolled from its spool and its teeth are removed at intervals, leaving spaces that surround smaller chains. For zippers that only open on one end, the bottom stop is first clamped on, and then the slider is threaded onto the chain. Next, the top stops are clamped on, and the gaps between lengths of teeth are cut at midpoint. For zippers that separate, the midpoint of each gap is coated with reinforcing tape, and the top stops are clamped on. The tape is then sliced to separate the strips of chain again. The slider and the box are then slipped onto one chain, and the pin is slipped onto the other.
9 Finished zippers are stacked, placed inboxes, and trucked to clothing manufacturers, luggage manufacturers, or any of the other manufacturers that rely on zippers.
Some are also shipped to department stores or fabric shops for direct purchase by the consumer.
Quality Control
Zippers, despite their numbers and practically worry-free use, are complicated devices that rely on a smooth, almost perfect linkage of tiny cupped teeth. Because they are usually designed to be fasteners for garments, they must also undergo a series of tests similar to those for clothing that undergo frequent laundering and wear.
A smoothly functioning zipper every time is the goal of zipper manufacturers, and such reliability is necessarily dependent on tolerances. Every dimension of a zipper—its width, length, tape end lengths, teeth dimensions, length of chain, slide dimensions, and stop lengths, to name a few—is subject to scrutiny that ascertains that values fall within an acceptable range. Samplers use statistical analysis to check the range of a batch of zippers. Generally, the dimensions of the zipper must be within 90 percent of the desired length, though in most cases it is closer to 99 percent.
A zipper is tested for flatness and straightness. Flatness is measured by passing a gauge set at a certain height over it; if the gauge touches the zipper several times, the zipper is defective. To measure straightness, the zipper is laid across a straight edge and scrutinized for any curving.
Zipper strength is important. This means that the teeth should not come off easily, nor should the zipper be easy to break. To test for strength, a tensile testing machine is attached by a hook to a tooth. The machine is then pulled, and a gauge measures at what force the tooth separates from the cloth. These same tensile testing machines are used to test the strength of the entire zipper. A machine is attached to each cloth tape, then pulled. The force required to pull the zipper completely apart into two separate pieces is measured. Acceptable strength values are determined according to what type of zipper is being made: a heavy-duty zipper will require higher values than a lightweight one. Zippers are also compressed to see when they break.
To measure a zipper for ease of zipping, a tensile testing machine measures the force needed to zip it up and down. For garments, this value should be quite low, so that the average person can zip with ease and so that the garment material does not tear. For other purposes, such as mattress covers, the force can be higher.
A finished sample zipper must meet textile quality controls. It is tested for laundering durability by being washed in a small amount of hot water, a significant amount of bleach, and abrasives to simulate many washings. Zippers are also agitated with small steel balls to test the zipper coating for abrasion. The cloth of the zipper tapes must be color- fast for the care instructions of the garment. For example, if the garment is to be dry cleaned only, its zipper must be colorfast during dry cleaning.
Shrinkage is also tested. Two marks are made on the cloth tape. After the zipper is heated or washed, the change in length between the two marks is measured. Heavyweight zippers should have no shrinkage. A lightweight zipper should have a one to four percent shrinkage rate.
Where To Learn More
Books
Petroski, Henry. The Evolution of Useful Things. Knopf, 1992.
Zipper! An Exploration in Novelty. W. W. Norton & Co., Inc., 1994.
Periodicals
Berendt, John. “The Zipper,” Esquire. May, 1989, p. 42.
G,etchell, Dave. “Zip It Up: How to Care For and Repair Zippers,” Backpacker. May,1993, p. 94.
Kraar, Louis. “Japanese Pick Up U.S. Ideas,” Fortune, Spring-Summer, 1991, p. 66.
“Zip,” The New Yorker. December 17, 1979, pp. 33-34.
Weiner, Lewis. “The Slide Fastener,” Scientific American. June, 1983, pp. 132¬144.

