Background
Many of the processes in the modem world involve the measurement and control of pressurized liquid and gas systems. This monitoring reflects certain performance criteria that must be controlled to produce the desirable results of the process and insure its safe operation. Boilers, refineries, water systems, and compressed gas systems are but a few of the many applications for pressure gauges.
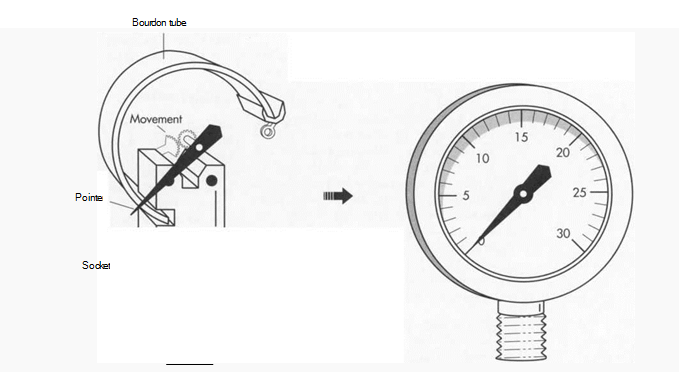
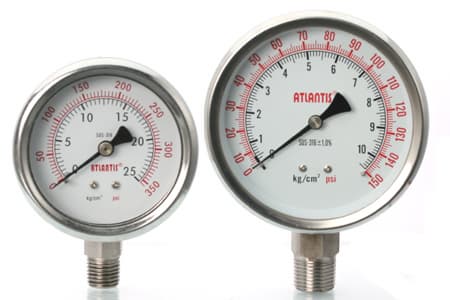
The mechanical pressure indicating instrument, or gauge, consists of an elastic pressure element; a threaded connection means called the “socket”; a sector and pinion gear mechanism called the “movement”; and the protective case, dial, and viewing lens assembly. The elastic pressure element is the member that actually displaces or moves due to the influence of pressure. When properly designed, this pressure element is both highly accurate and repeatable. The pressure element is connected to the geared “movement” mechanism, which in turn rotates a pointer throughout a graduated dial. It is the pointer’s position relative to the graduations that the viewer uses to determine the pressure indication.
The most common pressure gauge design was invented by French industrialist Eugene Bourdon in 1849. It utilizes a curved tube design as the pressure sensing element. A less common pressure element design is the diaphragm or disk type, which is especially sensitive at lower pressures. This article will focus on the Bourdon tube pressure gauge.
Design
In a Bourdon tube gauge, a “C” shaped, hollow spring tube is closed and sealed at one end. The opposite end is securely sealed and bonded to the socket, the threaded connection means. When the pressure medium (such as air, oil, or water) enters the tube through the socket, the pressure differential from the inside to the outside causes the tube to move. One can relate this movement to the uncoiling of a hose when pressurized with water, or the party whistle that uncoils when air is blown into it. The direction of this movement is determined by the curvature of the tubing, with the inside radius being slightly shorter than the outside radius. A specific amount of pressure causes the “C” shape to open up, or stretch, a specific distance. When the pressure is removed, the spring nature of the tube material returns the tube to its original shape and the tip to its original position relative to the socket.
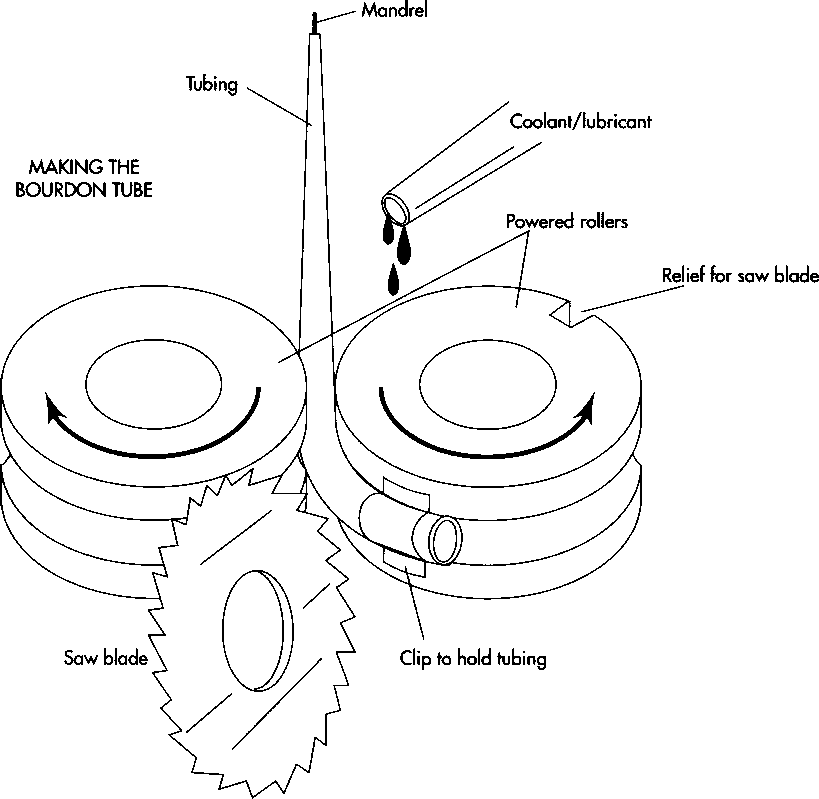
(A crucial step in the manufacture of a pressure gauge is making the C- shaped bourdon tube. In this step, a metal tube is pulled through grooved rollers on an automatic rolling machine. One roller grasps the tubing end and forms the inside radius, while the other provides outside pressure to maintain uniform contact with the tubing. The same roller that grabs and bends the tubing also contains a saw blade. As the roller continues turning after creating the bend, the saw blade on it cuts the tubing to the proper length. )
Raw Materials
Pressure gauge tubes are made of many materials, but the common design factor for these materials is the suitability for spring tempering. This tempering is a form of heat treating. It causes the metal to closely retain its original shape while allowing flexing or “elasticity” under load. Nearly all metals have some degree of elasticity, but spring tempering reinforces those desirable characteristics. Beryllium copper, phosphor bronze, and various alloys of steel and stainless steel all make excellent Bourdon tubes. The type of material chosen depends upon its corrosion properties with regards to the process media (water, air, oil, etc). Steel has a limited service life due to corrosion but is adequate for oil; stainless steel alloys add cost if specific corrosion resistance is not required; and beryllium copper is usually reserved for high pressure applications. Most gauges intended for general use of air, light oil, or water utilize phosphor bronze. The pressure range of the tubes is determined by the tubing wall thickness and the radius of the curvature. Instrument designers must use precise design and material selection, because exceeding the elastic limit will destroy the tube and accuracy will be lost.
The socket is usually made of brass, steel, or stainless steel. Lightweight gauges sometimes use aluminum, but this material has limited pressure service and is difficult to join to the Bourdon tube by soldering or brazing. Extrusions and rolled bar stock shapes are most commonly used.
The movement mechanism is made of glass filled polycarbonate, brass, nickel silver, or stainless steel. Whichever material is used, it rrfust be stable and allow for a friction-free assembly. Brass and combinations of brass and polycarbonate are most popular.
To protect the Bourdon tube and movement, the assembly is enclosed within a case and viewing lens. A dial and pointer, which are used to provide the viewer with the pressure indication, are made from nearly all basic metals, glass, and plastics. Aluminum, brass, and steel as well as polycarbonate and polypropylene make excellent gauge cases and dials. Most lenses are made of polycarbonate or acrylic, which are in favor over glass for obvious safety reasons. For severe service applications, the case is sealed and filled with glycerine or silicone fluid. This fluid cushions the tube and movement against damage from impact and vibration.
(After the Bourdon tube is made, its dosed end is attached to the socket by soldering, brazing, or welding. The free end of the Bourdon tube is precisely located during this assembly operation, and then sealed, usually by the same means used to join the tube to the socket. Once the Bourdon tube and socket assembly is secure, the tip of the unsupported end of the “C” is attached to an endpiece. This endpiece contains a small hole that connects the tip to the geared movement mechanism. The other components—the movement, pointer, and dial—are then assembled onto the socket as a group.)
The Manufacturing Process
Making the Bourdon tube
1 The Bourdon tube is the most important part of the instrument. The tube may be made from solid bar stock by drilling the length to the desired inside diameter and turning the outside diameter on a lathe to achieve the appropriate wall thickness. However, most general purpose gauges utilize preformed tubing purchased from a metals supplier. The gauge builder specifies the desired wall thickness, material, configuration, and diameter. The supplier provides the material in 10- to 12-foot (3- to 3.65-meter) lengths, ready for production.
2 Most manufacturers have closely guarded proprietary rolling methods for rolling the tubing into the “C” shape. The “C” shape of the tube is generally formed in an automatic rolling machine. This machine contains two precision, powered rollers, through which the tubing passes. One roller grasps the tubing end and forms the inside radius, while the other provides outside pressure to maintain uniform contact with the tubing. Each roller contains a groove that fits around the outside of the tubing; these grooves allow the tubing to maintain its circular shape rather than being flattened. In the rolling process, a steel mandrel—a bar that guides the tubing into the rollers and helps it keep its shape—is first inserted though the free end of the tubing and positioned just before the rollers. This lubricated mandrel is of the desired interior shape of the oval. The tubing then passes over the mandrel and between the rollers. One roller contains a clip that grabs the tubing; as the roller turns, it pulls the tubing and bends it into the “C” shape.
3 The same roller that grabs and bends the tubing also contains a saw blade. As the roller continues turning after creating the bend, the saw blade on it cuts the tubing to the proper length. The tubing is then heat treated in ovens.
Other components
4 The socket is basically a block of metal that serves as a connector to the source of the pressure medium; a mount for the case, dial, and movement; and as an attachment slot for the Bourdon tube. One end of the socket is threaded, which allows it to be screwed into the pressure-providing apparatus. The socket may be cast, forged, extruded, or machined from bar stock. Most sockets are made on automated machining centers that turn, drill, mill, and thread all in one cycle. General machining practices apply to most socket manufacture.
5 Movements are geared mechanisms that contain a pinion (a rotating shaft), sector, support plates, hairspring, and spacer columns. The mechanism converts the somewhat linear displacement of the Bourdon tip into rotary movement, as well as providing a means for calibration adjustment. The pointer is fastened to the rotating shaft, or pinion, and sweeps across the graduated dial indicating the pressure amount. Most movements are supplied to the gauge builder ready to use. Many types of manufacturing processes are used to produce the movement components, and the workmanship of the mechanism closely resembles a clockwork when completed.
6 The case, dial, and pointer may be sheet metal stampings, plastic moldings, or castings. Stampings and moldings require little further processing, but castings will require some machining—trimming off excess material, for instance—to meet the final requirements. These components are painted as required, and the dials are printed with the appropriate artwork. Common printing practice, utilizing both offset and direct methods, is used. The lens most commonly is a plastic part made by injection molding, whereby the plastic is heated into a molten state and then poured into a mold of the desired shape. The attachment feature that secures and seals the lens to the case is designed into the mold. Glass lenses are still used, but must be retained by a ring of some type. Glass has fallen out of favor because of the safety problems of breakage.
Final assembly
7 After the Bourdon tube is made, its closed end is attached to the socket by soldering, brazing, or welding. The free end of the Bourdon tube is precisely located during this assembly operation, and then sealed, usually by the same means used to join the tube to the socket. Once the Bourdon tube and socket assembly is secure, the tip of the unsupported end of the “C” is attached to an endpiece. This end piece contains a small hole that connects the tip to the geared movement mechanism. The Bourdon tip doesn’t move a great distance within its pressure range, typically .125 to .25 inch (.31 to .63 centimeter). Understandably, the greater the pressure, the farther the tip moves. The other components—the movement, pointer, and dial—are then assembled onto the socket as a group.
Calibration
Calibration occurs just before the final assembly of the gauge to the protective case and lens. The assembly consisting of the socket, tube, and movement is connected to a pressure source with a known “master” gauge. A “master” gauge is simply a high accuracy gauge of known calibration. Adjustments are made in the assembly until the new gauge reflects the same pressure readings as the master. Accuracy requirements of 2 percent difference are common, but some may be 1 percent, .5 percent, or even .25 percent. Selection of the accuracy range is solely dependant upon how important the information desired is in relationship to the control and safety of the process. Most manufacturers use a graduated dial featuring a 270 degree sweep from zero to full range. These dials can be from less than 1 inch (2.5 centimeters) to 3 feet (.9 meter) in diameter, with the largest typically used for extreme accuracy. By increasing the dial diameter, the circumference around the graduation line is made longer, allowing for many finely divided markings. These large gauges are usually very fragile and used for master purposes only. Masters themselves are inspected for accuracy periodically using dead weight testers, a very accurate hydraulic apparatus that is traceable to the National Bureau of Standards in the United States.
It is interesting to note that when the gauge manufacturing business was in its infancy, the theoretical design of the pressure element was still developing. The Bourdon tube was made with very general design parameters, because each tube was pressure tested to determine what range of service it was suitable for. One did not know exactly what pressure range was going to result from the rolling and heat treating process, so these instruments were sorted at calibration for specific application. Today, with the development of computer modeling and many decades of experience, modern Bourdon tubes are precisely rolled to specific dimensions that require little, if any, calibration. Modem calibration can be performed by computers using electronically controlled mechanical adjusters to adjust the components. This un-fortunately eliminates the image of the master craftsman sitting at the calibration bench, finely tuning a delicate, watch-like movement to extreme precision. Some instrument repair shops still perform this unique work, and these beautiful pressure gauges stand as equals to the clocks and timepieces created by master craftsmen years ago.
Applications and Future
Once the calibrated gauge is assembled and packaged, it is distributed to equipment manufacturers, service companies, and testing laboratories for use in many different applications. These varied applications account for the wide range in design of the case and lens enclosure. The socket may enter the case from the back, top, bottom or side. Some dials are illuminated by the luminescent inks used to print the graduations or by tiny lamps connected to an outside electrical source. Gauges intended for high pressure service usually are of “dead front” safety design, a case design feature that places a substantial thickness of case material between the Bourdon tube and the dial. This barrier protects the instrument viewer from gauge fragments should the Bourdon tube rupture due to excess pressure. The internal case design directs these high velocity pieces out the back of the gauge, away from the viewer. Many applications involve mounting the gauge directly to the running machinery, resulting in the need for liquid filling. Unfilled gauges quickly succumb to the destructive effects of vibration. Special mounting flanges are secured to the cases to allow for panel and surface mounting independent of the pressure plumbing. Case and lens materials are chosen to cope with a variety of abusive or contaminated environments, and are sealed by various means to keep moisture and contaminants out of the movement mechanism.
The use of pressure gauges in the future appears to be dependant on the quickly growing electronic sensor industry. These sensors are electronic components that provide an electrical signal and have essentially no moving parts. Many gauges today already have these sensors mounted within the case to send information to process control computers and controllers. These sensors are intrinsically safe, allowing their use in flammable or explosive environments. The whole process control issue has grown in recent years as a result of the need to prevent accidental releases of the process media, many of which are harmful to the environment. As environmental concerns grow, this interface will be in demand and the mechanical gauge may fall out of favor. However, the mechanical gauge does not require the electrical power source or the computer equipment needed by the electronic sensor. That makes the gauge cost effective for most general uses, and it is in this area that industry expects to continue to thrive.
Where To Learn More
Books
Kardos, Geza, ed. Bourdon Tubes and Bourdon Tube Gauges: An Annotated Bibliography. Books on Demand, 1989.
Pressure Gauge Handbook. M. Dekker, 1985.
Periodicals
Arslanian, Russ. “How to Select a Pressure Calibration Device.” InTech. June, 1989, pp. 84-85.
Garrett, D. Dewayne and M. C. Banta. “A Suggested Improvement for the Fabrication of Low-Cost Manometers.” Journal of Chemical Education. June, 1990, p. 523.
Jimenez-Dominguez, H., F. Figueroa-Lara, and S. Galindo. “Bourdon Gauge Absolute Manometer.” Review of Scientific Instruments. March, 1986, p. 499.

